UPDATE (2015-04-27): If you are interested in a more complex / real-world example, you might want to checkout the WM14 demo application. This application is built on the same technology stack and similar ideas, but uses player (plus tweets by the players) and match data from the Soccer Worldcup 2014 in Brazil to demonstrate integrating a Java middle-tier.
Build a simple (thin) web application with Spring Boot to demonstrate how to access domain-specific data (for the purpose of this sample: products) from MarkLogic via its Java API. According to Pivotals web site
Spring Boot aims to make it easy to create Spring-powered, production-grade applications and services with minimum fuss.
To interact easily with the exposed REST endpoints there is a small AngularJS web client sitting on top. For better understanding how MarkLogic's Java Client API handles JSON and XML documents both formats are supported in the sample application.
Since February 2013 everyone can get a free MarkLogic Developer License, which gives access to a powerful (= "Enterprise") NoSQL database and application platform, allowing to store and index different kind of document types and search by various ways to quickly drill-down to data you are looking for. Note: This sample does only touch the tip of the iceberg regarding MarkLogic's (search) features, it is really meant only to give you an idea how easy it is building applications with it.
As a Java developer I thought it was about time to start learning about MarkLogic server and how to use the Java API to deal with JSON and XML documents in regards to creation, binding and also query capabilites. With the recent advent of Spring Boot I wanted to show case how easy and straight forward it is, and how less Java code it requires, to get a small (state-of-the-art with microservices, plus bells and whistles ready for production) web application up and running.
-
Download MarkLogic server (version 7), Please note: you need to create an account with the MarkLogic developer community
-
Install, start and setup your MarkLogic server instance,
-
Bootstraping the database and creating an associated REST API instance (that will run on port 8110, see
gradle.properties) is handled by the gradle plug-in ml-gradle. This allows you to execute from the command-linegradle mlDeployinitially, the "deployment" also takes care of importing the required search options.
To compile and start the application you require a Java Development Kit (JDK 7) as well as Gradle.
For managing client-side dependencies (in this sample application: AngularJS and Bootstrap), please install bower if you haven't already. This requires Node.js and NPM. To install both, the easiest is to follow the instructions on the Node.js homepage.
npm install -g bower
Then we need to run Bower (from this project's root directory) the first time to download client-side dependencies in the proper directory:
bower install
To adjust the target directory bower will save the downloaded dependencies please customize the file .bowerrc.
First you need to adjust the configuration file which holds specifics about how your MarkLogic server can be connected to, the easiest way is by copying the file and modifying the connection string according to your settings:
vi src/main/resources/application.yml
NOTE: This will be refactored to make use of spring profiles in a future version.
To give the sample web application a spin, check out the sources from github and start the application directly from the command-line by executing:
gradle bootRun
If you want to open the sources with your favorite IDE, you might want to generate project files for Eclipse resp. IntelliJ IDEA with:
gradle eclipse
gradle idea
To start the app in debug mode (Port 5005 by default), run:
gradle bootRun --debug-jvm
The following examples use httpie as user-friendly cURL replacement.
http POST localhost:8080/products sku=4711 name='Super Duper' description='with bars...'
Look out for the Location HTTP Header allowing to retrieve this entity to a later point in time again.
http GET localhost:8080/products/4711.json
http GET localhost:8080/products.json name=='Super Duper'
http DELETE localhost:8080/products/4711.json
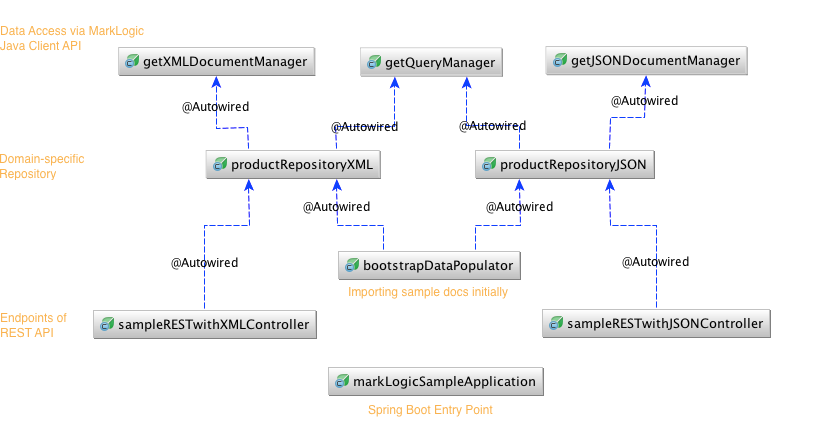
The following diagram shows which Spring beans are used by the sample application:
By using spring-loaded (see also spring-projects/spring-boot#887) it is possible (to some degree) to exchange recompiled classes while your application stays up running.
Set it up under VM options in your IDE (make auto-compile after save is working):
-javaagent:/path/to/springloaded-1.2.0.RELEASE.jar -noverify
- Introduction to the MarkLogic Java API
- Spring Boot Reference
- Spring Actuator: exposing metrics and allow to monitor the application easily
In case of any questions or suggestions please get into contact with the author of course reporting issues or even contribute pull requests via github are highly welcome.
